Aligning the Print Head Manually Using the Product Control Panel

If you cannot run an automatic print head alignment on your paper or automatic alignment does not correct the problem, you can manually align the print head using the control panel on your product.
  1. Load roll paper or cut sheet paper in the printer.
    Note: Load paper that is at least A4 (8.3 × 11.7 inches [210 × 297 mm]) in size.
  2. Make sure the correct paper type is selected.
    Note: If you are using commercially available paper, make sure you create the custom paper settings in advance.
  3. Press the  home button, if necessary.
  4. Select Menu > Paper Setting.


  5. Select the option for the paper loaded in the printer.
  6. Select Print Adjustments > Print Head Alignment.
  7. Select one of the following:
    • Uni-D Alignment: aligns each color for uni-directional printing (takes 25 to 35 minutes to complete)
    • Bi-D Alignment: aligns each color for bi-directional printing (takes 9 to 13 minutes to complete)
  8. Select Manual and select Start. The printer prints the first adjustment pattern. If you are printing on cut sheets, load additional sheets of paper after each pattern is printed.
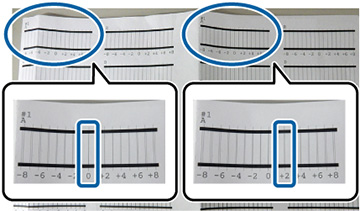
  9. After each alignment pattern is printed, view the LCD screen for instructions on selecting the best result in each pattern set. Multiple pattern sets may print, depending on the paper width. If so, check all pattern sets and average the adjustment value. For example, if two pattern sets print, and the best value for each set is 0 and 2, the average value would be 1. Enter 1 as the adjustment value. If the average value is not an integer, round it off to the nearest whole number.

    Uni-D Alignment


    Bi-D Alignment


  10. After the alignment is complete, check the results.
If the print head still seems misaligned, repeat the process.
Related tasks
Loading Roll Paper
Loading Cut Sheets
Creating Custom Paper Settings
Aligning the Print Head Automatically Using the Product Control Panel