|

User's Guide
|
|
Scanning
Using the Start Button on the Control Panel
 Scanning to your computer
Assigning a different application on Windows
Scanning to your computer
This product allows you to use the control panel to scan an image to a computer through a local or network connection. To scan an original using the control panel, the following software must be installed on the computer.
 |
For local computer:
|
 |
To use a computer that is directly connected to the product, you need to have installed EPSON Scan and EPSON Creativity Suite on your computer. If you are connecting this product to a computer through a local connection, an application is automatically launched on your computer by pressing the  Scan button on the control panel, selecting Local PC, and then pressing the Scan button on the control panel, selecting Local PC, and then pressing the  Right button. The application that starts differs according to the user settings. By default, EPSON File Manager is launched. Right button. The application that starts differs according to the user settings. By default, EPSON File Manager is launched.
|
|
|
For network computer (Windows only):
|
| |
To use a computer that is connected through a network, you need to have installed PageManager for EPSON, EPSON Scan, and EPSON Creativity Suite on the computer. When scanning an image using a network computer, you can select either Standard (automatic) scan or Manual scan. When you select the Standard scan, your original is automatically scanned with the appropriate settings. If you want to specify the scanning size, select Manual scan.
|
|
|
Scan modes
|
Available settings
|
Items
|
|
Standard scan
|
File Format
|
PDF, TIFF, JPG
|
|
Manual scan
|
File Format
|
PDF, TIFF, JPG
|
|
Paper Size
|
A4, B5, Letter, Legal
|
|
Note:
|
| -
EPSON Scan and EPSON Creativity Suite are installed in the standard installation using the installation software CD-ROM. To scan an original using a network computer, install PageManager for EPSON from a different CD-ROM that contains PageManager for EPSON. After installing PageManager for EPSON, start it and enter the license number according to the on-screen message. Then, restart the computer.
|
|
| -
When scanning an original on the document table, the product automatically recognizes the document type. If the document is recognized as text, the original is scanned as a black-and-white document even if it is a color document. To correctly scan a color original, select Network PC and use Manual Scan, or specify the detail settings for the image to be scanned in the Home Mode or Professional Mode using EPSON Scan on your computer. For details, see Colors differ from the original.
|
|
Before using this feature, make sure you have installed EPSON Scan and EPSON Creativity Suite on your computer.
Follow the steps below to use this feature.
 |
Connect this product to your computer with a USB cable or a network cable according to your environment, and then start up the computer.
|
 |
Make sure the product is turned on, and then place your original either on the document table or in the Auto Document Feeder (fax model only). For details, see Setting Your Originals.
|
|  |
Caution:
|
| |
To scan an original correctly, set the transportation lock on the left side of the document table in the  unlocked position. For details, see Scanner parts. unlocked position. For details, see Scanner parts.
|
|
 |
Press the Scan button on the control panel.
|
The Scan light is lit and the Scan menu appears in the LCD panel.
 |
Press the  Up or Up or  Down button to select either Local PC or Network PC, and then press the Right button. Down button to select either Local PC or Network PC, and then press the Right button.
|
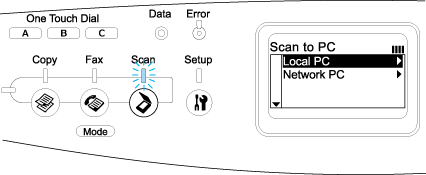
When selecting Local PC:
When a proper connection to the local computer is confirmed, a message to notify that the device is ready appears and scanning starts.
When selecting Network PC:
Network computer names appear in the LCD panel. Proceed to step 5.
 |
Press the Up or Down button to select your network computer, and then press the Right button.
|
You can select from the following scanning methods.
To scan with Standard scan, proceed to step 6.
To scan with Manual scan, proceed to step7.
 |
When you scan with Standard scan, press the  Left or Right button to select a file format from PDF, TIFF, and JPEG. Then proceed to step 10. Left or Right button to select a file format from PDF, TIFF, and JPEG. Then proceed to step 10.
|
 |
When you scan with Manual scan, press the Advanced/ Menu button.
|
 |
Press the Down button to select Manual Scan, and then press the Right button.
|
 |
Select your desired file format and paper size.
|
 |
Press the  B&W Start or Color Start button on the control panel. B&W Start or Color Start button on the control panel.
|
Scanning starts.
 |
To exit the scan settings, press the Left button several times or another mode's button.
|
When the scanning is complete, remove the original from the document table or the Auto Document Feeder.

[Top]
Assigning a different application on Windows
This section explains how to make settings that control which application to open when you press the B&W Start or Color Start button on the control panel. You can specify one application to open automatically when you press the B&W Start or Color Start button, or you can have a window open allowing you to choose from a list of applications. Follow the steps below to make these settings.
|
Note:
|
| |
Before using this feature, make sure you have installed EPSON Scan and EPSON Creativity Suite on your computer.
|
|
|
Note for Mac OS users:
|
| |
You cannot assign any application to the B&W Start or Color Start button on the product. This feature is for Windows only.
|
|
For Windows XP users
|
|
Click Start, and then point to Control Panel.
|
|
|
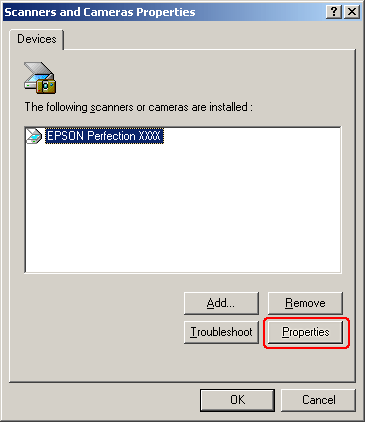
Click the Scanners and Cameras icon in the control panel.
|

|
|
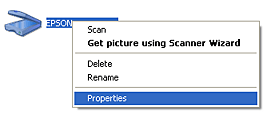
Right-click your product's icon, and then select Properties.
|
|
|
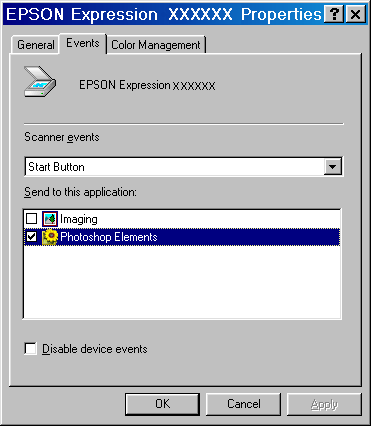
Select the Events tab.
|

|
|
Select Start Button from the Select an event list. Select Start this program and then select a desired application from the list.
|
| |
Note:
|
| | -
If Prompt for which program to run is selected, when the button is pressed, a dialog box appears to prompt you to select an application from the list.
|
|
| | -
Some applications do not support linkage to scanners and digital cameras. Linkage is available only to applications that appear on the list.
|
|
|
|
To save your settings, click Apply and then OK.
|
| |
Note:
|
| | |
You need to click Apply whenever you change a setting.
|
|
If you need to disable the Scanner events, select Take no action in the product's Properties dialog box.
For Windows Me, 98, and 2000 users
|
Note for Windows 98 and 2000 users:
|
| |
Screen shots for Windows Me are used in this section, so they may differ in appearance from what actually appears on your screen. The instructions are the same.
|
|
|
|
Click Start, point to Settings, and then select Control Panel.
|
|
|
Double-click the Scanners and Cameras icon.
|

|
|
For Windows Me users:
Right-click your product's icon, and then select Properties.
|

For Windows 98 and 2000 users:
Select your product from the installed scanners and cameras list. Click Properties.
|
|
Select the Events tab.
|
|
|
Select a desired button from the Scanner events list, and then select the check box of a desired application in the Send to this application list. Clear the rest of the check boxes.
|
| |
Note:
|
| | -
If multiple applications are selected, when you click the button, a dialog box appears to prompt you to select just one from the list.
|
|
| | -
Some applications do not support linkage to scanners and digital cameras. Linkage is available only to applications that appear in the Send to this application list.
|
|
|
|
To save your settings, click Apply and then OK.
|
| |
Note:
|
| | |
You need to click Apply whenever you change a button setting.
|
|
| |
Note for Windows 2000 users:
|
| | |
Be sure to restart the computer.
|
|
If you need to disable the Scanner events, select the Disable device events check box in the product's Properties dialog box.
[Top]
| Version 1.00E, Copyright © 2003, SEIKO EPSON CORPORATION |

