|

Reference Guide
|
|
Scanning / Various Scanning Options
Scanning Images Cleanly
 Restore color faded images
 Enhance the quality of the scanned image (PRINT Image Matching)
This section explains EPSON Scan's features that you can use to scan images cleanly.
Restore color faded images
Color Restoration is a scanner software feature that restores color faded on photos.
 |
Note:
|
 | |
Depending on the condition of photos, color may not be restored as you desire.
|
|
Follow the steps below to restore color using Color Restoration in the Professional Mode.
 |
Place your materials on the document table.
|
 |
Start EPSON Scan and then select the Professional Mode. For details on how to select the scanning mode, see Changing the Scanning Mode.
|
The following window appears.

 |
Specify the Original and Destination settings to match your document.
|
 |
Click Preview to preview the images.
|
 |
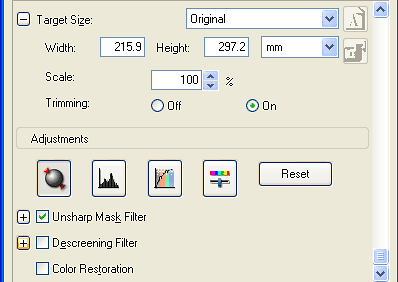
Specify the output size of the scanned image as Target Size and make adjustments using the image quality adjustment tools, if necessary.
|

 |
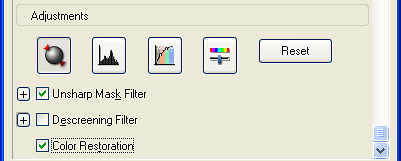
Select the Color Restoration check box.
|

The restored color is displayed on the previewed image.
|
Color Restoration not applied
|
Color Restoration applied
|

|

|
 |
Click Scan. EPSON Scan starts scanning.
|
The scanned images are sent to the application or saved to the specified folder.

[Top]
Enhance the quality of the scanned image (PRINT Image Matching)
PRINT Image Matching is a standardized method of recording a wider range of color information to enhance the quality of your scanned images. Using this product with PRINT Image Matching, you can effortlessly achieve printouts that come to life with a dynamic range of brilliant colors.
 |
Note:
|
 | |
PRINT Image Matching information does not change the image data or the way the image is displayed on a computer screen.
|
|
Follow the steps below to enhance the quality of your scanned images using EPSON Smart Panel.
 |
Place your materials on the document table.
|
 |
Start EPSON Smart Panel.
|
EPSON Smart Panel starts and the following window appears.

 |
Click the Scan and Save icon on the EPSON Smart Panel.
|
 |
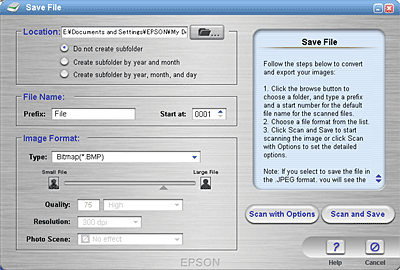
Specify Location, File Name, and Image Format settings. Select Print Image Matching II (JPEG) or Print Image Matching II (TIFF) from the Type list box, and change the Photo Scene setting, if necessary.
|

 |
Click Scan and Save to start scanning or Scan with Options to change scanning settings.
|

[Top]
| Version 1.00E, Copyright © 2001, SEIKO EPSON CORPORATION |
![]()
Restore color faded images
Enhance the quality of the scanned image (PRINT Image Matching)


