|

Reference Guide
|
|
Scanning / Scanning Using Control Panel Functions
Using Control Panel Functions
 Scanning to Your Computer
Scanning Directly to Your E-mail
This product allows you to scan an image to a computer or send an e-mail with the scanned image attached by using the buttons on the control panel. Before using this feature, make sure you have installed EPSON Scan and EPSON Smart Panel on your computer.
 |
Note:
|
 | |
For help on the EPSON Smart Panel software, click the question mark at the lower right corner of the window.
|
|
|
Note for Windows users:
|
|
Note for Mac OS X users:
|
Scanning to Your Computer
You can scan an image and then save the scanned image on your computer.
 |
Connect this product to your computer, and then start up the computer.
|
 |
Place your materials on the document table.
|
Placing Photos and Documents on the Document Table
 |
Press the Scan Mode button to enter the Scan Mode.
|
 |
Press the A button or the  / / Select button repeatedly until 2.To PC appears on the LCD panel, and then press the D or OK button. Select button repeatedly until 2.To PC appears on the LCD panel, and then press the D or OK button.
|
The EPSON Smart Panel window appears.

 |
Click an application icon. The selected application opens and start scanning, and then the scanned image is automatically sent to application. Refer to the EPSON Smart Panel online help for details.
|
|  |
Caution:
|
| | |
Never open the scanner unit while scanning or copying; otherwise, you may damage this product.
|
|

[Top]
Scanning Directly to Your E-mail
You can scan an image and then send an e-mail message with the scanned image attached.
|
Note:
|
| |
An e-mail program must be installed on your computer before you can use this feature.
|
|
|
|
Connect this product to your computer, and then start up the computer.
|
|
|
Place your materials on the document table.
|
Placing Photos and Documents on the Document Table
|
|
Press the Scan Mode button to enter the Scan Mode.
|
|
|
Press the A button or the / Select button repeatedly until 3.To E-mail appears on the LCD panel, and then press the D or OK button.
|
The EPSON Smart Panel window appears.
|
|
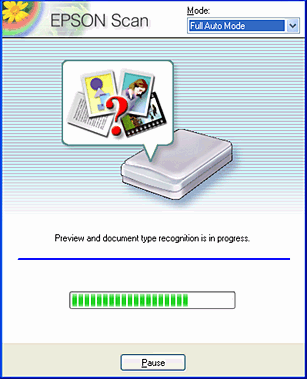
EPSON Scan automatically previews the image and recognizes its image type.
|
| |
Note:
|
| | |
To cancel the operation, click Pause and then click Close.
|
|
 |
The following window appears with a progress bar to indicate the scanning progress. You can see the type of document being scanned. When scanning multiple photos, you can also see the number of scanned images.
|
 |
The scanned image displayed in View Images and Set Options dialog. Change scan settings and click Next.
|
 |
The scanned image is transferred to a pre-selected e-mail program and then attached to a new e-mail massage.
|
| |
Note:
|
| | -
If no e-mail program has been selected, the Select Software dialog box appears. For details, refer to the EPSON Smart Panel documentation.
|
|
| | -
For details about the settings, refer to the EPSON Smart Panel documentation.
|
|
[Top]
| Version 1.00E, Copyright © 2001, SEIKO EPSON CORPORATION |