|

Reference Guide
|
|
How To
Create Beautiful Reproductions
 Remove the moiré patterns from a scanned image
Improve image sharpness
Enhance the color of a scanned image
Restore faded color images
Remove dust on film
Enhance the quality of the scanned image (PRINT Image Matching)
EPSON Scan provides you with a variety of settings to improve the quality of scanned images. In this section, you will get information on what you can do and how to do it.
Remove the moiré patterns from a scanned image
You can remove the wavy or rippled pattern called "moirés" which tends to appear in areas of halftone color such as skin color. Follow the steps below to remove these patterns.
 |
Note:
|
 | -
This feature is not available when the resolution is set to greater than 600 dpi.
|
|
| -
In the Home Mode or Professional Mode, you cannot use this feature when Film is selected for Document Type.
|
|
| -
You cannot use this feature when Black&White is selected for Image Type.
|
|
| -
The result of removing moiré patterns does not appear on previewed image.
|
|
 |
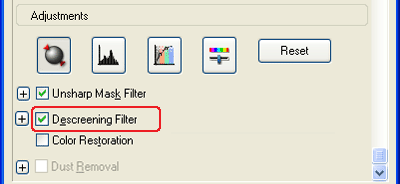
Select the Descreening Filter check box in the Adjustments section (you may need to scroll to the bottom of the screen). In the Home Mode, open the Image Adjustments dialog box first to get to the Descreening Filter check box.
|
 |
Click the plus mark button to the left of the section, and then select Screen Ruling appropriate for the image being scanned. (In Home Mode, this function is not available.)
|
|
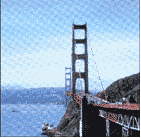
Descreening Filter not applied
|
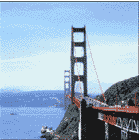
Descreening Filter applied
|
|
|

[Top]
Improve image sharpness
If the outline of the image is not sharp enough, you can improve the sharpness by using this feature in the Professional Mode. (This feature is automatically enabled in the Home Mode). Follow the steps below.
|
Note:
|
| |
This feature is not available when Color Smoothing or Black&White is selected for the Image Type.
|
|
|
|
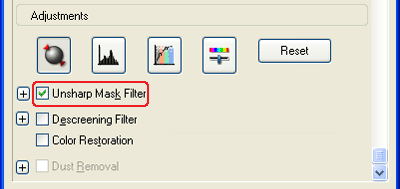
Select the Unsharp Mask Filter check box in the Adjustments section (you may need to scroll to the bottom of the screen).
|
|
Unsharp Mask Filter not applied
|
Unsharp Mask Filter applied
|

|
|
|
|
Click the button next to the checkbox to select the level of adjustment.
|
[Top]
Enhance the color of a scanned image
You can enhance the color of a scanned image by adjusting the brightness, contrast, or color balance. Follow the steps below.
|
Note:
|
| |
This feature is only available when you are scanning a color image.
|
|
|
|
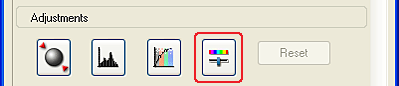
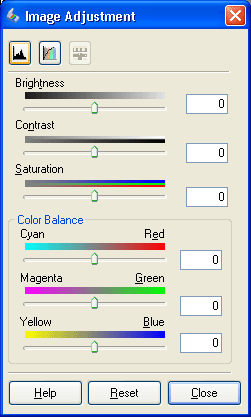
Click the Image Adjustment button.
|
|
|
Adjust the items you want to change by sliding the tabs.
|
|
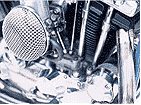
Image Adjustment not applied
|
Image Adjustment applied
|

|

|
 |
Close the Image Adjustment window by clicking the Close button.
|
[Top]
Restore faded color images
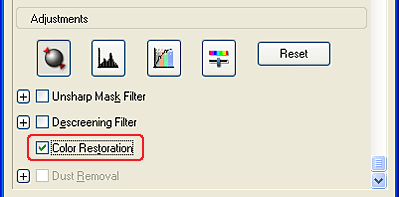
Color Restoration is a scanner software feature that restores faded color on film and photos. Select the Color Restoration check box in the Adjustments section (you may need to scroll to the bottom of the screen). In Home Mode, open the Image Adjustments dialog box first to get to the Color Restoration check box.
|
Note:
|
| -
Do not specify Document for Auto Exposure Type.
|
|
| -
Depending on the condition of your film or photos, the color may not be restored as you desire.
|
|
[Top]
Remove dust on film
You can improve the quality of scanned images by removing dust on film using this feature.
Select the Dust Removal check box. (You may need to scroll to the bottom of the screen.) In Home Mode, open the Image Adjustments dialog box first to get to the Dust Removal check box.
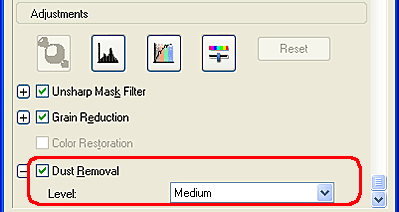
Dust on the film is removed from the scanned images.
|
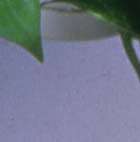
Dust Removal not applied
|
Dust Removal applied
|

|
|
|
Note:
|
| -
This function is only available when Film is selected for Document Type.
|
|
| -
Before placing your film on the document table, remove any dust that you can see on the film.
|
|
| -
The result of Dust Removal does not appear on the previewed image. Check the result on the scanned image.
|
|
[Top]
Enhance the quality of the scanned image (PRINT Image Matching)
PRINT Image Matching is a standardized method of recording a wider range of color information to enhance the quality of your scanned images. Using a printer compatible with PRINT Image Matching, you can effortlessly achieve printouts that come to life with a dynamic range of brilliant colors.
|
Note:
|
| |
PRINT Image Matching information does not change the image data or the way the image is displayed on a computer screen.
|
|
Follow the steps below to enhance the quality of your scanned images using EPSON Smart Panel.
|
|
Place your materials on the document table.
|
|
|
Press the  Start button on your scanner. Start button on your scanner.
|
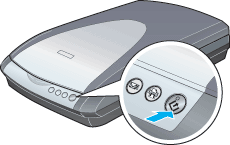
EPSON Smart Panel starts and the following window appears.

|
|
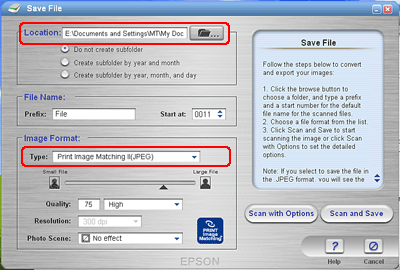
Click the Scan and Save icon on EPSON Smart Panel. The Scan and Save application starts.
|
 |
Specify the Location, File Name, and Image Format settings. For an image format type, select Print Image Matching II (JPEG) or Print Image Matching II (TIFF) from the Image Format Type list box.
|
|
JPEG (*.JPG)
|
A compressed file format. The compression quality can be selected. The JPEG format enables relatively high compression ratio. However, the higher the compression ratio is, the lower the image quality becomes. (Note that the original data cannot be restored.) In addition, the quality deteriorates every time the data is saved. The TIFF format is recommended in cases where modification and retouching are required.
|
|
TIFF (*.TIF)
|
A file format created for exchanging data among many applications, such as graphic and DTP software. When scanning black & white images, you can specify the compression type.
|
 |
Click Scan and Save. EPSON Scan starts.
|
The following window appears.

 |
Specify the Original and Destination settings to match your photo.
|
 |
Click Preview to preview the image.
|
 |
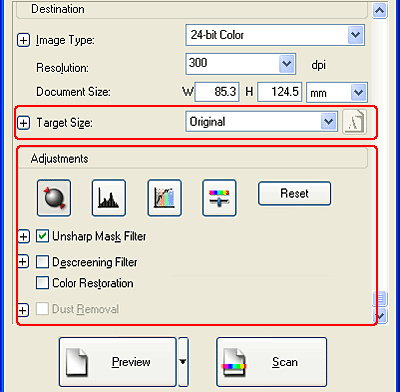
Specify the output size of the scanned image as Target Size, and specify Adjustment settings, if necessary. (You may need to scroll to the bottom of the screen.)
|
 |
Click Scan to start scanning.
The scanned image is saved to the specified folder.
|
[Top]
| Version 1.00E, Copyright © 2001, SEIKO EPSON CORPORATION |


