|

Reference Guide
|
|
Paper Handling
Using Roll Paper
 Attaching the roll paper to the spindle
Removing the roll paper from the spindle
Attaching and removing the spindle from the printer
Loading the roll paper
Using the roll paper belt
Cutting roll paper or printing page lines
Attaching the roll paper to the spindle
When installing the roll paper onto the spindle, follow the steps below. To remove roll paper or empty roll paper cores, see Removing the roll paper from the spindle.
 |
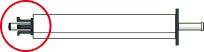
Slide the movable flange off the end of the spindle.
|

 |
Place the roll paper on a flat surface so that it does not unwind. Slide the roll paper onto the spindle and onto the flange until it fixes into place.
|

 |
Slide the movable flange (removed in step 1) onto the spindle and into the end of the roll paper until it fixes into place.
|


[Top]
Removing the roll paper from the spindle
To remove the roll paper from the spindle, follow the steps below.
|
|
Place the paper loaded spindle down on a flat surface.
|
|
|
Slide the movable flange off the end of the spindle by tapping the same end of the spindle with your hand to loosen it. The flange is removed.
|
 |  |
Caution:
|
| |
To remove the movable flange from the spindle, do not hold the spindle vertically and tap the end on the floor; otherwise, damage may occur.
|

|
|
Remove the roll paper from the spindle.
|

 |
Note:
|
|
Store unused roll paper in its original package. Put the roll paper into the plastic bag, and outer package so as to avoid moisture problems.
|
[Top]
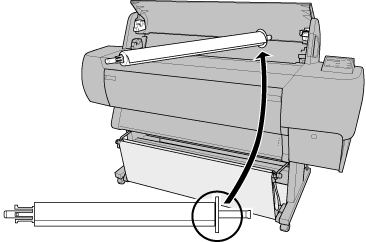
Attaching and removing the spindle from the printer
To attach the paper loaded spindle to the printer, follow the steps below. When you remove the spindle from the printer, clear the roll paper from the paper insertion slot, then reverse the steps below.
You can attach two roll paper spindles to the printer at once except if you are using the 3 inch Roll Media Spindle (C811031) in which case you can only attach one. This optional spindle is necessary if you wish to use the 3 inch diameter roll paper.
|
Note:
|
|
If two roll paper spindles are attached to the printer, keep the unused roll wound up using the roll paper belt, to avoid paper jams. See Using the roll paper belt.
|
|
|
Open the roll paper cover.
|
|
|
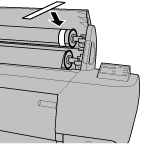
Make sure that the movable flange is fixed into the end of the roll paper properly.
|
|
|
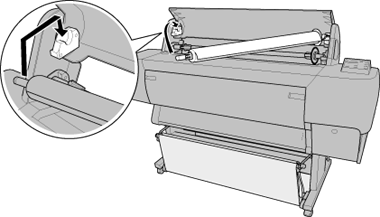
Hold the roll paper spindle so that the fixed flange is positioned to the right side.
|
 |
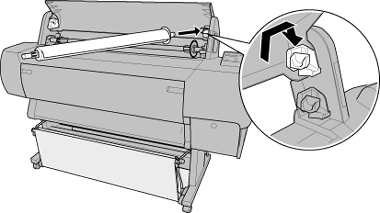
Place the right end of the spindle into the right mounting bracket inside the printer.
|
| |
Note:
|
| |
To mount the spindle correctly, match the color of the end of the spindle with the mounting bracket.
|
 |
Place the left end of the spindle into the left mounting bracket inside the printer.
|
 |
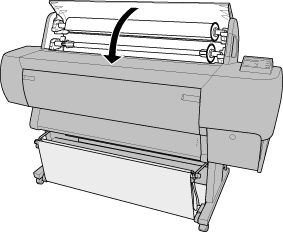
Close the roll paper cover or see "Loading the roll paper" following to load paper.
|
[Top]
Loading the roll paper
To load roll paper, follow the steps below.
|
Note:
|
|
You may want to setup the paper basket before printing. See Setting the Paper Basket. (In the illustrations below the paper basket is set to feed paper backwards.)
|
|
|
Open the roll paper cover. Make sure that the roll paper is attached to the printer properly.
|
| |
Note:
|
| |
If two roll paper spindles are attached to the printer, keep the unused roll wound up using the roll paper belt to avoid paper jams. See Using the roll paper belt.
|
|
|
Make sure that the printer is on.
|
|
|
Press the Paper Source button repeatedly until the Roll Auto Cut light or Roll Cutter Off light is on.
|
| |
Caution:
|
| |
If you are loading thick roll paper, select Roll Cutter Off. Paper that is too thick may damage the paper cutter.
|
|
|
Make sure the Operate light or Pause light is not flashing, then set the paper set lever to the released position. The Paper Out light turns on and LOAD PAPER appears on the LCD panel.
|

| |
Caution:
|
| |
Do not set the paper set lever to the released position while the Operate light or Pause light is flashing. Doing so may damage the printer.
|
|
|
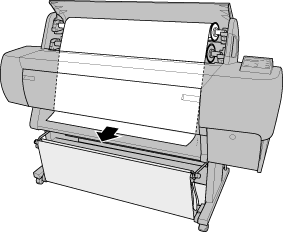
Load the paper into the paper insertion slot.
|

|
|
Pull the paper down through the paper insertion slot so that it comes out below.
|
| |
Note:
|
| |
If the roll paper does not come out, follow the instructions below.
|
-
Adjust the feed strength by pressing the Paper Feed buttons on the control panel. When using thick, heavy, or curled paper, press the Paper Feed (+) button to increase the power. When using thin or light paper, press the Paper Feed (-) button to decrease the power.

-
If the paper does not come out even after executing the procedure above, open the front cover and pull the paper out manually.
 |
Holding the bottom edge of the paper, turn the roll paper to remove slack. Make sure that the bottom edge of the paper is straight, and that it is aligned with the row of holes.
|
| |
Note:
|
| |
You do not have to align the right end of the paper with the right row of punch holes.
|

 |
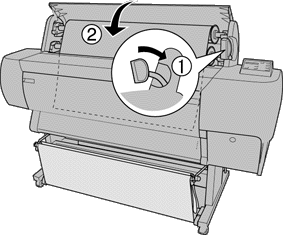
Set the paper set lever to the secured position, then close the roll paper cover. PRESS PAUSE BUTTON appears.
|
| |
Note:
|
| |
If the Roll Auto Cut light is on, and the bottom edge of the roll paper was not cut properly after the previous print job, press the Cut/Eject button to recut the edge.
|
 |
Press the Pause button.
|
The print heads move and the paper feeds into the printing position automatically. READY appears on the LCD panel.
| |
Note:
|
| |
Even if you do not press the Pause button, the print heads move and paper feeds into the printing position automatically. READY appears on the LCD panel.
|
| |
Note:
|
| |
Make sure that the Paper Source setting in the printer driver matches the paper loaded in the printer.
|
[Top]
Using the roll paper belt
To keep the roll paper wound up, use the roll paper belt packed with your printer. When you attach two roll paper spindles, paper jams can be avoided.
Tap the end of the roll paper belt lightly on the roll paper. The belt will wrap itself around the roll paper.
To remove the roll paper belt, simply unwrap it from around the paper. While you do not use the roll paper belt, keep it wound around the end of the spindle.

[Top]
Cutting roll paper or printing page lines
When your print job is finished, the printer cuts the roll paper automatically or prints page lines around the document according to your settings. You can make these settings using the control panel or printer software.
|
Note:
|
|
Software usually overrides control panel settings. Use your software to make settings whenever possible.
|
Using the Auto Cut setting
When you want the roll paper to be cut automatically after your print job, use the Auto Cut setting. To make the Auto Cut setting using the Paper Source button on the control panel, see Buttons. To use the printer software, see Using the Roll Paper Settings.
|
Note:
|
|
When the printer cuts the paper, first the left part of the paper is cut, then the right, and finally the center. Never turn off the printer before the paper is cut completely.
|
Cutting the roll paper manually
To cut the roll paper when the Auto Cut setting is off, follow the steps below.
Cutting after the document is printed
|
|
Make sure the document is printed, then press the Paper Source button repeatedly until the Roll Auto Cut light is on.
|
|
|
Press the Cut/Eject button. The roll paper is cut.
|
Cutting the roll paper at other times
|
|
Press the Paper Feed button to position the paper in place for cutting.
|
|
|
Press the Paper Source button repeatedly until the Roll Auto Cut light is on.
|
|
|
Press the Cut/Eject button. The roll paper is cut.
|
Printing page lines
If you want to print continuously on roll paper first, then cut the page yourself after you finish printing, use the Print Page Line setting. To make the Print Page Line setting using the control panel, see SelecType Settings. To use the printer software, see Print Page Line.
[Top]
| Version 1.00E, Copyright © 2001, SEIKO EPSON CORPORATION |


