|

Reference Guide
|
|
How To
Scanning Images for Printing
 Full Auto Mode
Home Mode
Professional Mode
When you want to print scanned images on your EPSON ink jet printer or have prints made at your favorite film developing service, set the output resolution to 300 dpi. If you select a resolution higher than 300 dpi, printing takes a longer time but the output quality does not change.
You can also use the Reprint Photo feature in the EPSON Smart Panel software
to scan images for printing. For more details, see Reprint
Photos.
Full Auto Mode
Follow the steps below to scan images for printing in Full Auto Mode.
 |
Place your materials on the document table.
|
 |
Start EPSON Scan.
|
EPSON Scan starts previewing and recognizing the document source and type.
 |
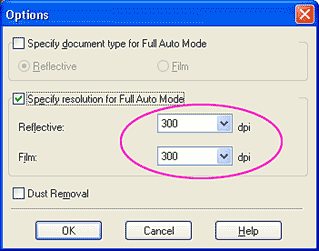
Click Pause, and then click Options.
|

 |
Select the Specify resolution for Full Auto Mode check box.
|

 |
Select 300 from the list for Reflective or Film, and then click OK.
|
 |
Click Scan. EPSON Scan starts scanning.
|
The scanned images are opened in the application or saved to the specified folder.
 |
Note:
|
 | -
If EPSON Scan cannot recognize the correct document source, you can specify the document type in the Options dialog box. For details, see the online help.
|
|
| -
If you do not get the results you expect, scan the image in Home Mode or Professional Mode.
|
|

[Top]
Home Mode
Follow the steps below to scan images for printing in Home Mode.
|
|
Place your materials on the document table.
|
|
|
Start EPSON Scan.
|
The following window appears.

|
|
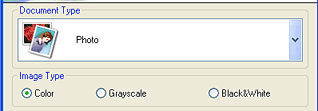
Specify the Document Type and Image Type settings to match your images.
|
|
|
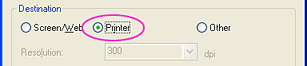
Select Printer as the Destination.
|
|
|
Click Preview to preview the image. |
|
|
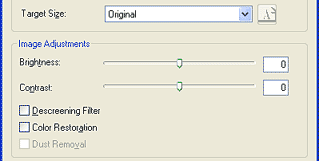
Specify the output size for your scanned image as the Target Size and make adjustments using the image quality adjustment tools, if necessary.
|
 |
Click Scan. EPSON Scan starts scanning.
|
The scanned images are opened in the application or saved to the specified folder.
[Top]
Professional Mode
Follow the steps below to scan materials for printing in Professional Mode.
|
|
Place your materials on the document table.
|
|
|
Start EPSON Scan.
|
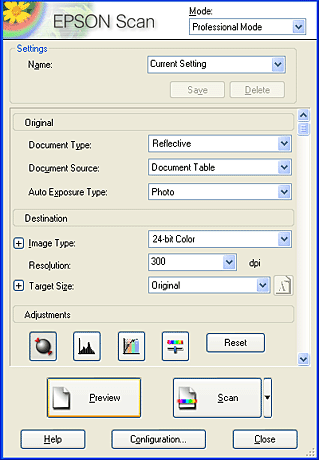
The following window appears.
|
|
Specify the Original and Image Type settings to match your images.
|

|
|
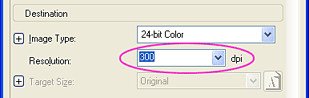
Select 300 dpi from the Resolution list.
|
|
|
Click Preview to preview the image. |
|
|
Specify the output size for your scanned image as the Target Size and make adjustments using the image quality adjustment tools, if necessary.
|

|
|
Click Scan. EPSON Scan starts scanning.
|
The scanned images are opened in the application or saved to the specified folder.
[Top]
| Version 1.00E, Copyright © 2001, SEIKO EPSON CORPORATION |


