|

Reference Guide
|
|
How To
Scanning Images for
Viewing on a Computer Screen
 Full Auto Mode
Home Mode
Professional Mode
When you want to view scanned images on a computer screen, set the output resolution to 96 dpi. The monitor can reproduce images only up to 96 dpi. Scanning at a high resolution is counterproductive. The low resolution image files are smaller and easy to handle. Therefore, use low resolution to scan images for use on the Internet or in e-mail.
 |
Note:
|
 |
|
Low resolution is not recommended if scanning images sent through
e-mail are intended for printing. In this case, the output resolution
is too low for printing. See Scanning
Images for Printing. |
|
Full Auto Mode
Follow the steps below to scan images for viewing on a computer screen in Full Auto Mode.
 |
Place your materials on the document table.
|
 |
Start EPSON Scan.
|
EPSON Scan starts previewing and recognizing the document source and type.
 |
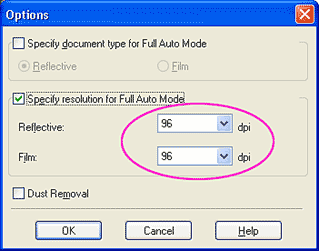
Click Pause, and then click Options.
|

 |
Select the Specify resolution for Full Auto Mode check box.
|

 |
Select 96 from the list for Reflective or Film, and then click OK.
|
 |
Click Scan. EPSON Scan starts scanning.
|
The scanned images are opened in to the application or saved to the specified folder.
|
Note:
|
| -
If EPSON Scan cannot recognize the correct document source, you can specify the document type in the Options dialog box. For details, see the online help.
|
|
| -
If you do not get the results you expect, scan the image in Home Mode or Professional Mode.
|
|

[Top]
Home Mode
Follow the steps below to scan images for viewing on a computer screen in Home Mode.
|
|
Place your materials on the document table.
|
|
|
Start EPSON Scan.
|
The following window appears.

|
|
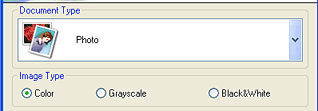
Specify the Document Type and Image Type settings to match your image.
|
|
|
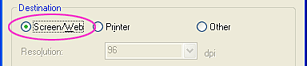
Select Screen/Web as the Destination.
|
|
|
Click Preview to preview the image.
|
|
|
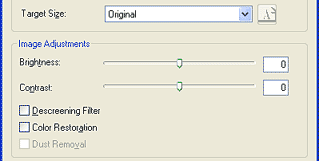
Specify the output size for your scanned image as the Target Size and make adjustments using the image quality adjustment tools, if necessary.
|
 |
Click Scan. EPSON Scan starts scanning.
|
The scanned image is opened in the application or saved to the specified folder.
[Top]
Professional Mode
Follow the steps below to scan materials for viewing on a computer screen in Professional Mode.
|
|
Place your materials on the document table.
|
|
|
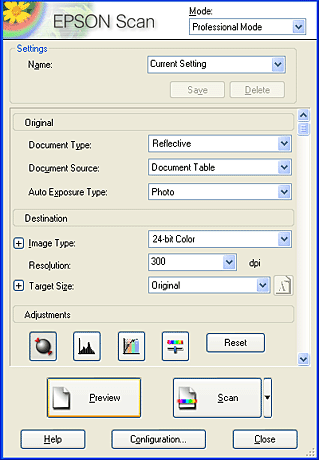
Start EPSON Scan.
|
The following window appears.
|
|
Specify the Original and Image Type settings to match your image.
|

|
|
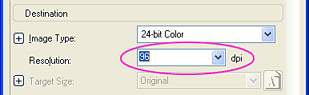
Select 96 dpi from the Resolution list.
|
|
|
Click Preview to preview the image.
|
|
|
Specify the output size for your scanned image as the Target Size and make adjustments using the image quality adjustment tools, if necessary.
|

|
|
Click Scan. EPSON Scan starts scanning.
|
The scanned image is opened in the application or saved to the specified folder.
[Top]
| Version 1.00E, Copyright © 2001, SEIKO EPSON CORPORATION |


