Before you can project from computers on your network, you need to select network settings on the projector.

Make sure you already connected the projector to your wired network using the LAN port.
Press the Menu button, select the Network menu, and press Enter.
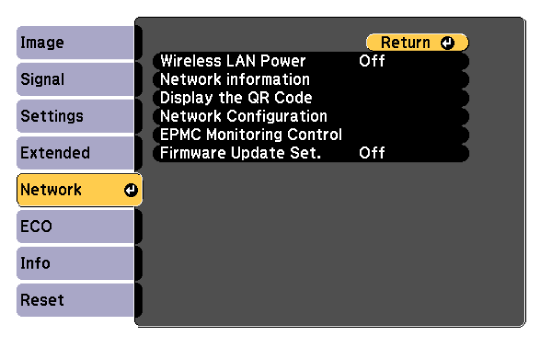
Select Network Configuration and press Enter.
Select the Basic menu and press Enter.
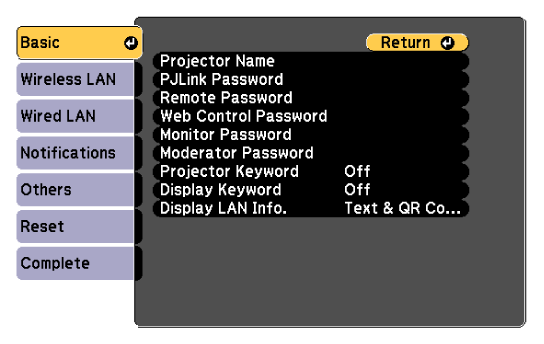
Select the basic options as necessary.
Projector Name lets you enter a name up to 16 alphanumeric characters long to identify the projector over the network.
PJLink Password lets you enter a password up to 32 alphanumeric characters long for using the PJLink protocol for projector control.
Remote Password lets you enter a password up to 32 alphanumeric characters long for accessing the projector using the Basic Control. (The user name is EPSONREMOTE. No password is set by default.)
Web Control Password lets you enter a password up to 32 alphanumeric characters long for accessing the projector over the Web. (The user name is EPSONWEB. No password is set by default.)
Monitor Password lets you enter a password up to 16 alphanumeric characters long when using Epson Projector Management Ver.5.30 or earlier, or when monitoring the projector in combination with a switcher or controller. (No password is set by default.)
Moderator Password lets you enter a four-digit number password for accessing the projector as a moderator using Epson iProjection. (No password is set by default.)
Projector Keyword lets you turn on a security password to prevent access to the projector by anyone not in the room with it. You must enter a displayed, randomized keyword from a computer using Epson iProjection to access the projector and share the current screen.
Display Keyword lets you select whether to display a projector keyword on the projected image when accessing the projector using Epson iProjection.
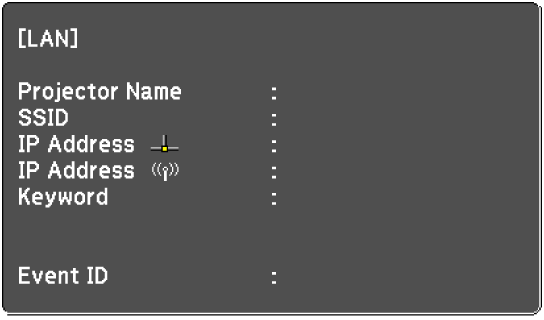
Display LAN Info. lets you set the display format for the projector's network information.
Use the displayed keyboard to enter numbers and characters. Press the arrow buttons on the remote control to highlight characters and press Enter to select them.
Select the Wired LAN menu and press Enter.
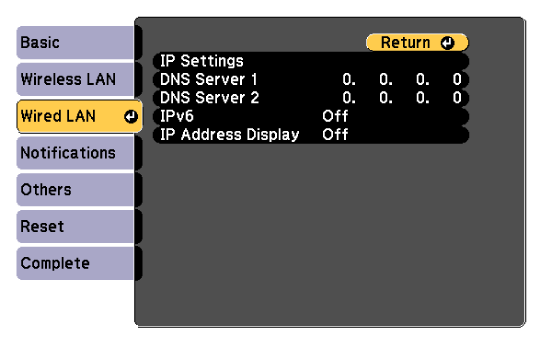
Assign the IP settings for your network as necessary.
If your network assigns addresses automatically, select IP Settings to set the DHCP setting to On.
If you must set addresses manually, select IP Settings to set the DHCP setting to Off, and then enter the projector's IP Address, Subnet Mask, and Gateway Address as necessary.
To highlight the numbers you want from the displayed keyboard, press the arrow buttons on the remote control. To select a highlighted number, press Enter.
To prevent the IP address from being displayed on the LAN standby screen and Home screen, set the IP Address Display setting to Off.
When you finish selecting settings, select Complete and follow the on-screen instructions to save your settings and exit the menus.
If no Web Control Password has been set, a screen prompting you to set a password is displayed before you can save the settings. Follow the on-screen instructions to set the password.
Press the Source Search button on the control panel or remote control until you see the LAN standby screen.