
You can select the connected device that is available for HDMI Link and control the selected device using the HDMI Link features.

When you use the HDMI Link features, set the HDMI Link setting to On in the projector's Signal I/O menu.
 Signal I/O >
HDMI Link >
HDMI Link
Signal I/O >
HDMI Link >
HDMI Link
You must also configure the connected device. See the documentation supplied with the device for more information.
Some connected devices or functions of those devices may not operate properly even if they meet the HDMI CEC standard. See the documentation supplied with the device for more information.
Use a cable that supports the HDMI standard.
Press the HDMI Link button on the remote control.
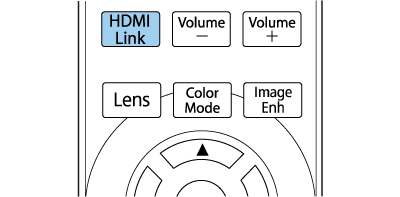
Make sure HDMI Link is set to On.
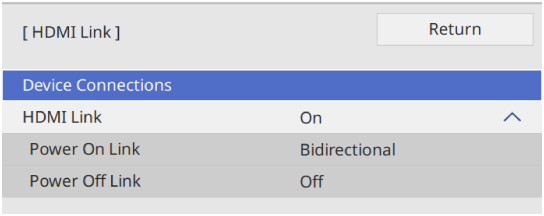
Select Device Connections and press Enter.
Select the device you want to control and project the image from, and press Enter.
A linked device is indicated by a blue mark.
The device name is left blank if it cannot be acquired.
Press Esc to select the HDMI Link options as necessary.
Power On Link lets you control what happens when you turn on the projector or linked device.
Select PJ -> Device or Bidirectional to turn the linked device on when the projector is turned on.
Select Device -> PJ or Bidirectional to turn the projector on when the linked device is turned on.
Power Off Link lets you control whether linked devices are turned off when the projector is turned off.
Power Off Link only works when the connected device's CEC power link function is enabled.
Note that depending on the status of the connected device (for example, if it is recording), the device may not be turned off.
Press HDMI Link or Esc to exit the menus.
You can also set the HDMI Link setting in the projector's Signal I/O menu.
 Related Links