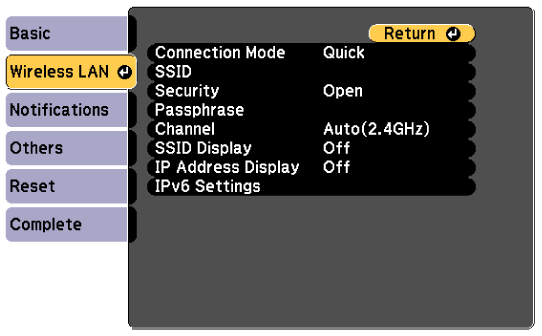
Settings on the Wireless LAN menu let you select the wireless LAN settings.
 Network >
Network Configuration
>
Wireless LAN
This menu is available only for models that support wireless LAN projection.

|
Setting |
Options |
Description |
|---|---|---|
|
Connection Mode |
|
Select the type of wireless connection: |
|
|
Quick |
Quick: lets you connect to multiple smartphones, tablets, or computers directly using wireless communication. When you select Quick connection mode, the projector acts as an easy access point. (We recommend limiting the number of devices to six or less to maintain the projection performance.) |
|
|
Advanced |
Advanced: lets you connect to multiple smartphones, tablets, or computers over a wireless network access point. |
|
Search Access Point |
To Search View |
Search for available wireless network access points in Advanced connection mode. Depending on the access point settings, they may not be displayed in the list. |
|
SSID |
Up to 32 alphanumeric characters |
Sets the SSID (network name) of the wireless LAN system the projector is connecting to. |
|
Security |
|
Selects the type of security used on the wireless network. When setting security, follow the instructions from the administrator of the network system you want to connect to. |
|
|
Open |
Security is not set. |
|
|
WPA2-PSK |
Communication is performed using WPA2 security. Uses AES method for encryption. When establishing a connection from a computer to the projector, enter the value set in the passphrase. |
|
|
WPA3-PSK |
Communication is performed using WPA3 security. Uses AES method for encryption. When establishing a connection from a computer to the projector, enter the value set in the passphrase. |
|
|
WPA2/WPA3-PSK |
Connects in WPA2/WPA3 personal mode. Encryption method is selected automatically according to the access point settings. Set a passphrase which is the same for the access point. |
|
Passphrase |
Various passphrases from 8 to 32 characters (when entering from a Web browser: various passphrases from 8 to 63 characters) |
For WPA2-PSK, WPA3-PSK and WPA2/WPA3-PSK security, selects the pre-shared passphrase used on the network. When the passphrase is entered and the Enter button is pressed, the value is set and displayed as an asterisk (*). We recommend changing the passphrase periodically for security. If the network settings are initialized, it returns to the initial passphrase. |
|
Channel |
Various channels available |
In Quick connection mode, selects the frequency band (channel) used by the wireless LAN. |
|
IP Settings |
DHCP IP Address Subnet Mask Gateway Address |
DHCP: set to On if your network assigns addresses automatically; set to Off to manually enter the network's IP Address, Subnet Mask, and Gateway Address using 0 to 255 for each address field. Do not use these addresses: 0.0.0.0, 127.x.x.x, 192.0.2.x or 224.0.0.0 through 255.255.255.255 (where x is a number from 0 to 255) for IP Address, 255.255.255.255 or 0.0.0.0 through 254.255.255.255 for Subnet Mask, and 0.0.0.0, 127.x.x.x or 224.0.0.0 through 255.255.255.255 for Gateway Address. |
|
SSID Display |
On Off |
Select whether to display the SSID on the network standby screen and Home screen. |
|
IP Address Display |
On Off |
Select whether to display the IP address on the network standby screen and Home screen. |
|
IPv6 Settings |
|
Select the IPv6 settings if you want to connect the projector to the network using IPv6: |
|
|
IPv6 |
IPv6: set to On if you want to connect the projector to the network using IPv6. IPv6 is supported to monitor and control the projector over a network using Epson Web Control. |
|
|
Auto Configuration |
Auto Configuration: set to On to assign addresses automatically according to the Router Advertisement. |
|
|
Use Temporary Address |
Use Temporary Address: set to On if you want to use a temporary IPv6 address. |