
After connecting a USB device to the projector, you can switch to the USB input source and start your slide show.

You can change the PC Free operation options or add special effects by highlighting Option at the bottom of the screen and pressing Enter.
Press the USB button on the remote control.
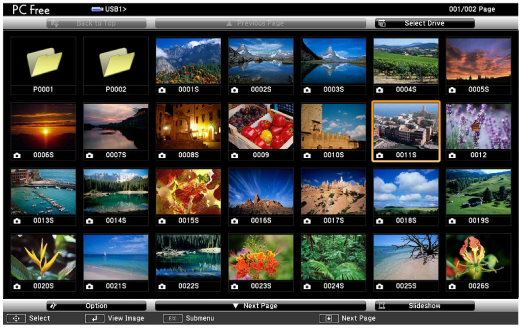
If the Select Drive screen is displayed, press the arrow buttons to select the drive and press Enter.
To display images on the other USB drive, highlight Select Drive at the top of the file list screen and press Enter.
Do one of the following to locate your files:
If you need to display files inside a subfolder on your device, press the arrow buttons to highlight the folder and press Enter.
To move back up a folder level on your device, highlight Back to Top and press Enter.
Do one of the following:
To display an individual image, press the arrow buttons to highlight the image and press Enter. (Press the Esc button to return to the file list screen.)
To display a slide show of all the images in a folder, press the arrow buttons to highlight the Slideshow option at the bottom of the screen and press Enter.
You can change the image switching time by highlighting Option at the bottom of the screen and pressing Enter.
If any file names are longer than the display area or include unsupported symbols, the file names may be shortened or changed only on the screen display.
While projecting, use the following commands to control the display:
To rotate a displayed image, press the up or down arrow button.
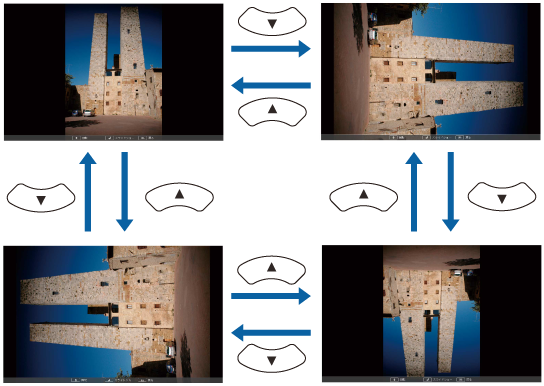
To move to the next or previous image, press the left or right arrow button.
To stop the display, follow the on-screen instructions or press the Esc button.
Turn off the USB device, if necessary, and then disconnect the device from the projector.
 Related Links