
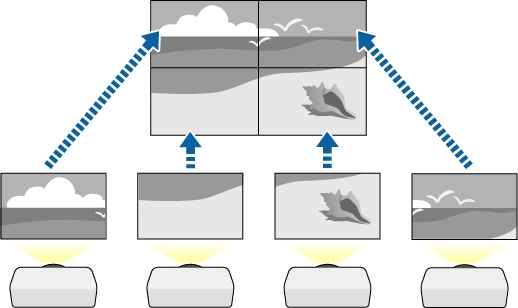
If you have not installed the optional external camera or the Epson Projector Professional Tool software is not available, you can project one large image from up to 15 projectors using the projector's menu. This section explains how to adjust the images from all projectors manually.
Select the Projector ID setting in the projector's Multi-Projection menu, and give each projector a unique ID to control multiple projectors from a remote control.
Set the remote control's ID to match the projector's ID to operate only a particular projector. Press the ID button on the remote control, and then press the numeric button that matches the projector's ID within 5 seconds. (Enter a one-digit number.)
If you are combining images from multiple projectors on a network, select the Projector Grouping setting on the primary projector and create a group of projectors that you can control simultaneously.
Select Group Tiling setting in the projector's Multi-Projection menu on the primary projector, and press Enter.
Select Tiling and press Enter.
Select the Tiling setting to adjust the arrangement of the images to create one large image.
If you have installed the optional external camera, select Auto on the primary projector.
If you have not installed the optional external camera or tiling the images automatically was unsuccessful, select Manual.
When selecting Manual, select Layout, and then select the number of rows and columns you are setting up as the Row and Column settings.
After making the Layout settings, select Location Setup. Select the position of each projected image as follows: Row Order to layout the screens from top to bottom in sequential order starting with 1 at the top, Column Order to layout the screens from left to right starting with A on the left.
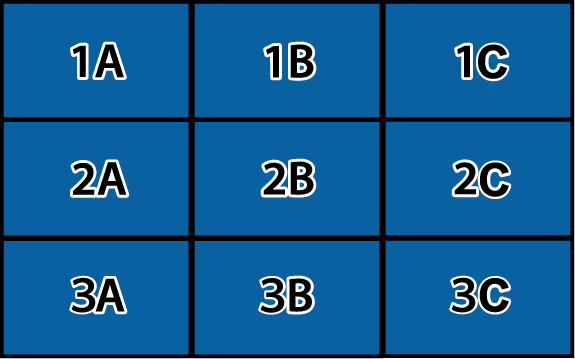
Select the Layout and Location Setup settings on each projector you are setting up.
Select the input signal to display an image.
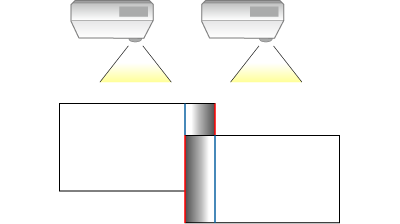
Select Edge Blending to adjust the edges of the images.
Set the Edge Blending setting to Blending/Black Level and turn on the Line Guide and Pattern Guide settings first.
Select the edge you want to blend on each projector, and set the Blending setting to On.
Select the Blend Start Position setting and adjust the blending start position.
Select the Blend Range setting and use the arrow buttons to select the width of the blended area so that the displayed guides are at the edges of the overlapping area between the two images.
Select the Blend Curve setting and select a gradient for the shaded area on the projectors.
Select the Black Level settings to make the difference less noticeable for the overlapping areas.
Select Color Adjustment first.
The adjustment areas are displayed based on the Edge Blending setting.
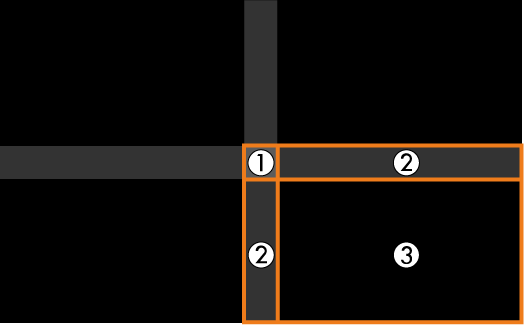
Use the arrow buttons to select the area you want to adjust and press Enter.
The selected area is displayed in orange. Adjust the black tone.

When multiple screens are overlapping, adjust based on the area with the most overlap (the brightest area). In the illustration below, first align (2) with (1), and then adjust so that (3) aligns with (2).
Repeat these steps as needed to adjust any remaining screen areas.
When you are finished, press the Esc button.
If there are areas where the color does not match, select Area Correction.
Select Start Adjustments first.
Boundary lines indicating where images overlap are displayed. The lines are displayed based on the Edge Blending setting.
Use the arrow buttons to select the boundary line you want to adjust, and then press Enter.
The selected line is displayed in orange.

Use the arrow buttons to adjust the line position, and then press Enter. Next, use the arrow buttons to select the point you want to move, and then press Enter.
The selected point is displayed in orange. You can move the point using the arrow buttons.


You can change the number of the displayed points using the Points setting.
To continue to move another point, press Esc and then repeat the previous steps.
To adjust another boundary line, press Esc until the screen is displayed.
If you are combining images from multiple projectors on a network, select the Screen Matching setting to adjust the brightness and tint of the images.
The required time for screen matching varies depending on the layout and number of projectors. It can take up to approximately 18 minutes.
If the projectors are not connected to a network or you want to adjust manually after performing automatic adjustments, select the Color Matching setting to adjust the brightness and tint of the images manually.
Select a value for the Adjustment Level setting, and adjust the color tone for the Red, Green, or Blue settings, and then adjust the Brightness setting.
Repeat these steps as necessary to adjust each adjustment level.
Select the Scale setting to select sections of the images.
Set the Scale setting to Auto or Manual first.
Select the Scale Mode setting and select one of the following options:
Zoom Display to maintain the image aspect ratio as you scale the image.
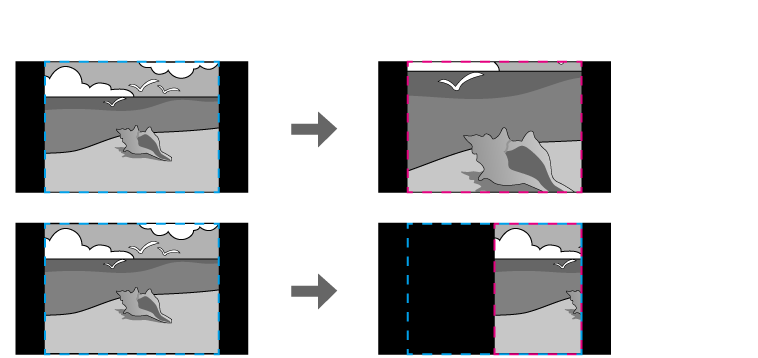
Full Display to adjust the image to the projector's screen size as you scale the image.
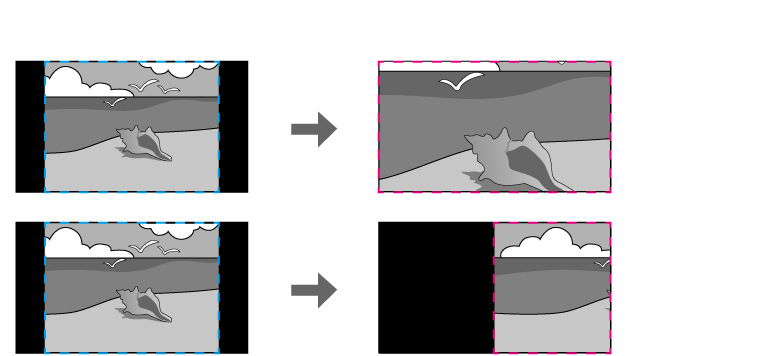
Select one or more of the following scaling options and adjust it as necessary:
Scale V/H to scale the image horizontally and vertically at the same time.
Scale Vertically to scale the image vertically only.
Scale Horizontally to scale the image horizontally only.
Select the Clip Adjustment setting and use the arrow buttons to adjust the coordinates and size of each image as you view the screen.
Select Display Clip Range to preview the clipped area you selected.