
Options on the Basic Control screen allow you to select the input source and control the projector.

If you see a log in window, enter your user name and password. (The user name is EPSONREMOTE. No password is set by default. When you are using the function for the first time, follow the on-screen instructions to set a password.)
You can change the password in the projector's Network menu.
 Network >
Network Settings >
Projector Control
>
Basic Control
Network >
Network Settings >
Projector Control
>
Basic Control
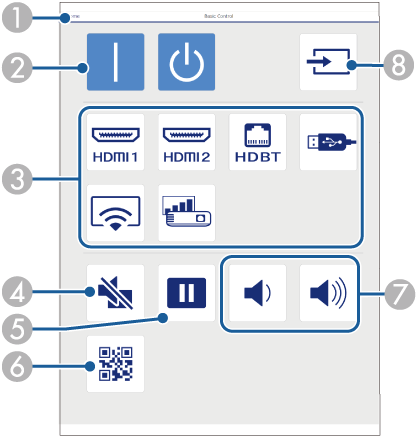
|
|
Returns to the Epson Web Control screen. |
|
|
Turns the projector on or off. |
|
|
Selects the input source. |
|
|
Turns the video and audio on or off temporarily. |
|
|
Pauses or resumes images. |
|
|
Displays the QR code. |
|
|
Adjusts the speaker volume. |
|
|
Searches for sources. |
Options on the OSD Control Pad screen allow you to display the projector's setting menus and select them moving your finger or mouse on the pad.
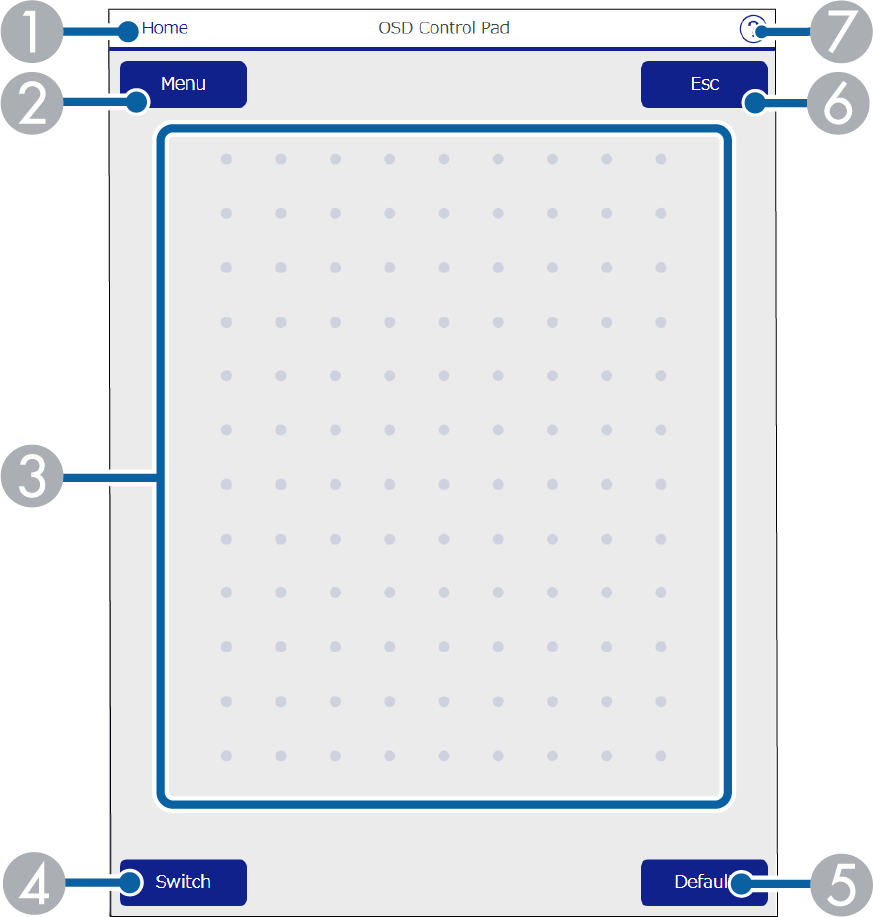
|
|
Returns to the Epson Web Control screen. |
|
|
Displays the projector's setting menus. |
|
|
Use your finger or mouse to navigate the menus. |
|
|
Displays the button operation screen. |
|
|
Resets the selected setting to its default value. |
|
|
Returns to the previous menu. |
|
|
Displays help topics. |
The Test Pattern screen displays the available test patterns and allow you to select to project it.
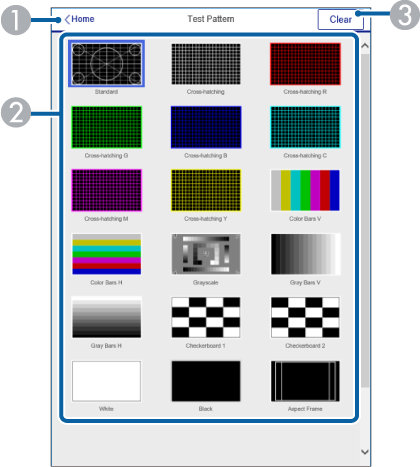
|
|
Returns to the Epson Web Control screen. |
|
|
Displays available test patterns; select to project a test pattern. |
|
|
Turns off test pattern display. |
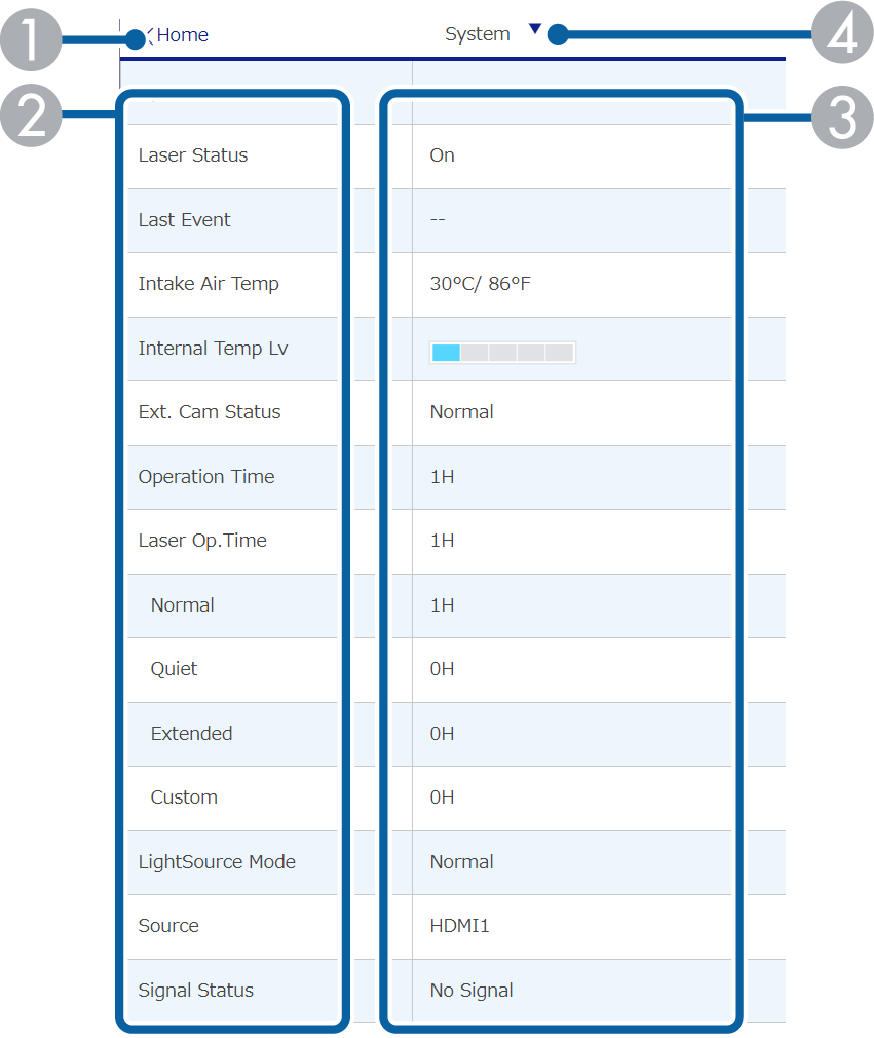
|
|
Returns to the Epson Web Control screen. |
|
|
Displays a list of monitored settings. |
|
|
Displays the setting status. |
|
|
Select to view different status information. |
|
|
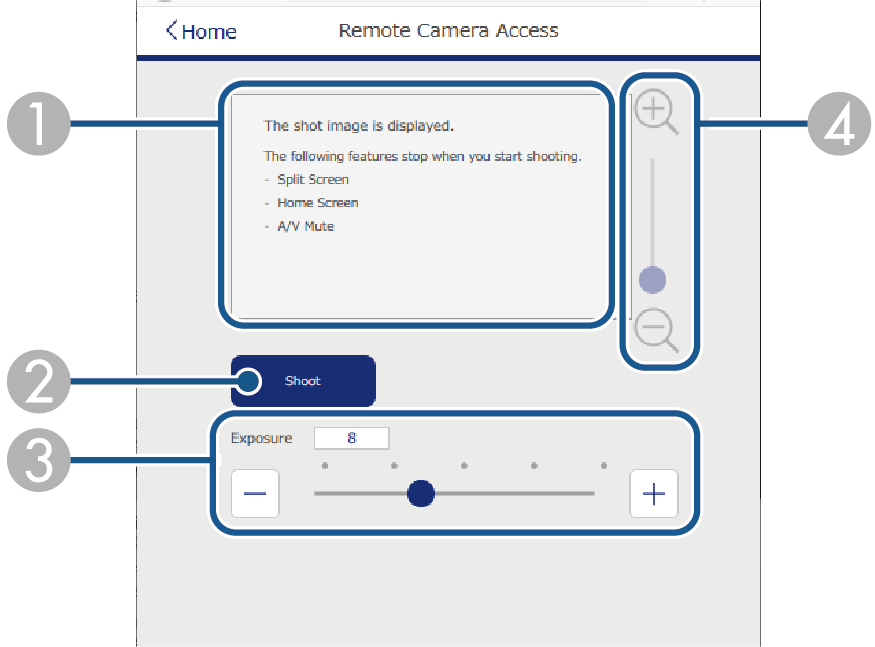
Displays the image you captured using the Shoot button. |
|
|
Takes a picture of the projected image using the optional external camera installed on the projector. |
|
|
Adjusts the image exposure. |
|
|
Zooms in or out on the image you captured. |
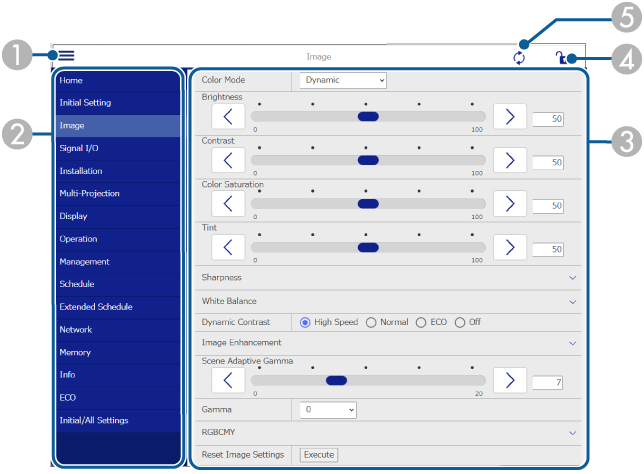
The Advanced screen allow you to select the projector's settings.
|
|
Opens the menus. |
|
|
Displays the menu name you selected. |
|
|
Specifies the projector settings. (The available settings vary depending on your projector model.) |
|
|
Locks/unlocks the projector settings. |
|
|
Updates the projector settings. |
You cannot change the following settings using Epson Web Control.
HDMI Link
Batch Setup
Camera Correction Assist
Remote Camera Access
Content Playback
Customize Button
User's Logo
Wireless LAN Diagnosis
Language
Search Access Point
Crestron Connected
HDBaseT Signal Level
Event ID
HDBaseT Tx
Antenna Level
Reset Network Settings
Firmware Update
You can select the following settings only with Epson Web Control.
Monitor Password (up to 16 alphanumeric characters)
IPv6 Settings (manual)
HTTP port (port number used for Web Control except for 80 [default], 843, 3620, 3621, 3625, 3629, 4352, 4649, 5357, 10000, 10001, 41794)
Display Logs
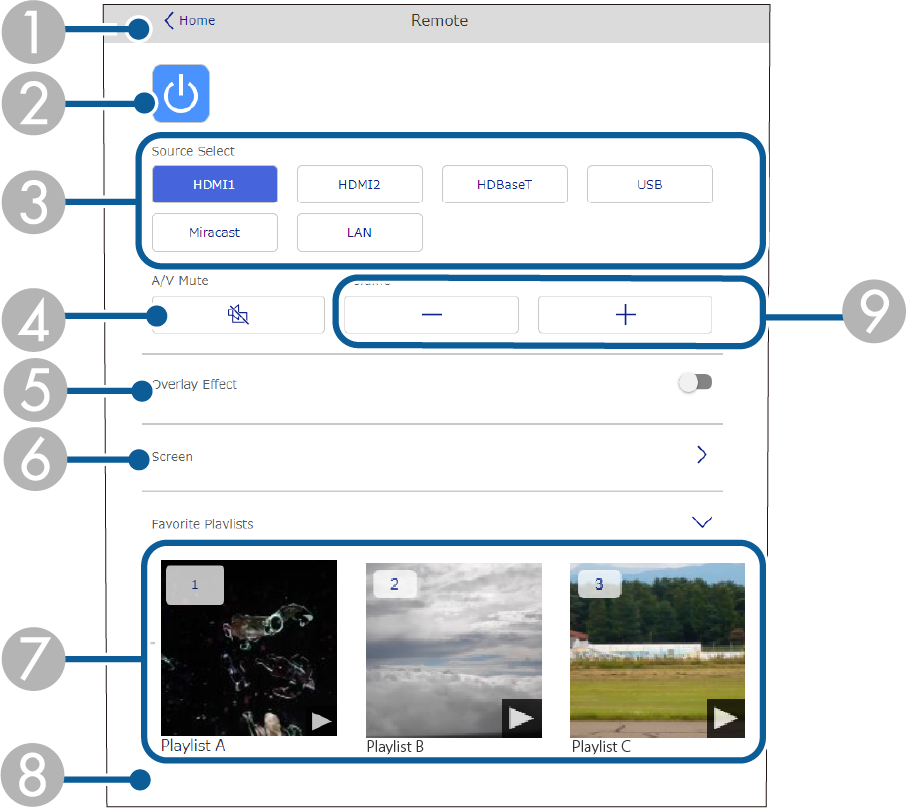
Options on the Remote screen allow you to select the input source, control the projector, and start projecting playlists.
|
|
Returns to the Epson Web Control screen. |
|
|
Turns the projector on or off. |
|
|
Selects the input source. (The available sources vary depending on your projector model.) |
|
|
Turns the video and audio on or off temporarily. |
|
|
Overlay Effect option is displayed when the current source is anything other than USB. Turns Overlay Effect on or off to add color and shape effects to a playlist. When turning on, the Effects screen is displayed. You can add predefined color and shape effect filters to a playlist. You can also create a customized effect. |
|
|
Specifies the screen settings. |
|
|
Displays your favorite playlists. Select a playlist to start projecting. |
|
|
Displays information for the playlist being projected. The icons indicate the playlist settings.
Select the arrow at the bottom-right to display the following screen. |
|
|
Adjusts the speaker volume. |
|
|
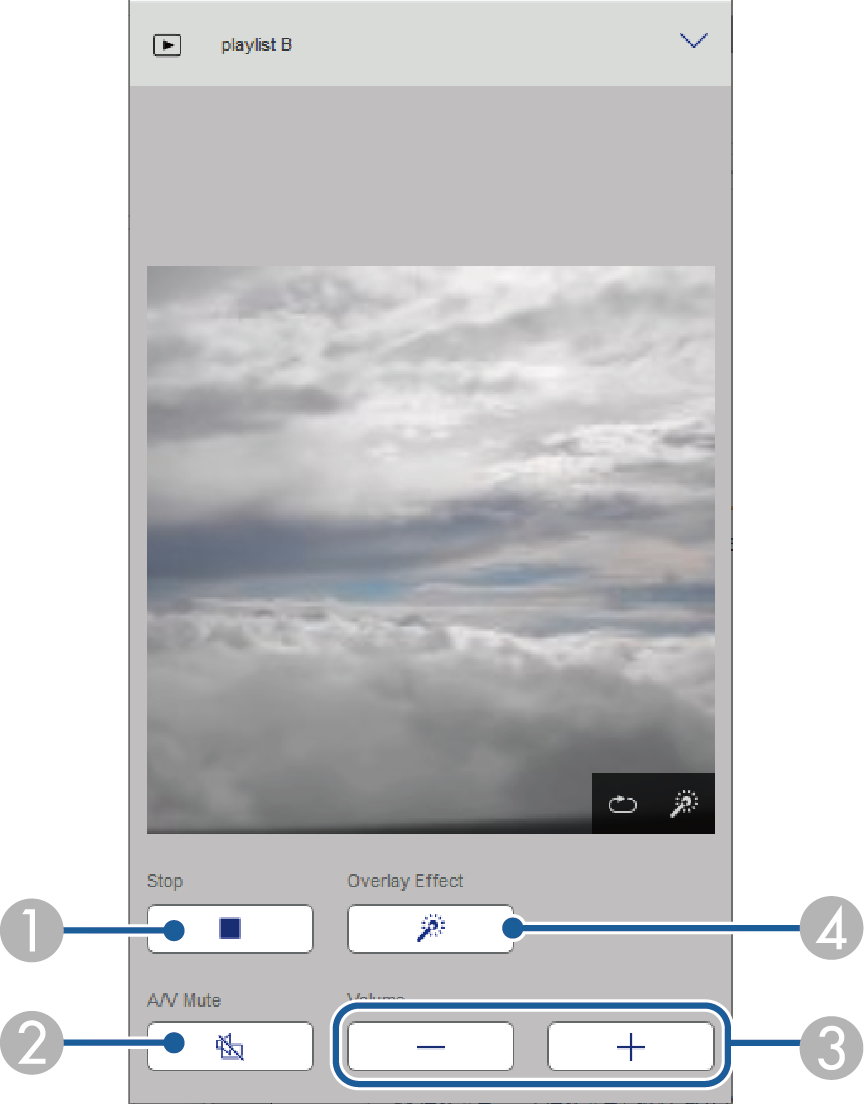
Stops projection. |
|
|
Turns the video and audio on or off temporarily. However, the audio and video continue to run so you cannot resume projection at the point you activated this function. |
|
|
Adjusts the speaker volume. |
|
|
Opens the Effects screen. You can select preset effects or select individual brightness, color, and shape effect filters. |
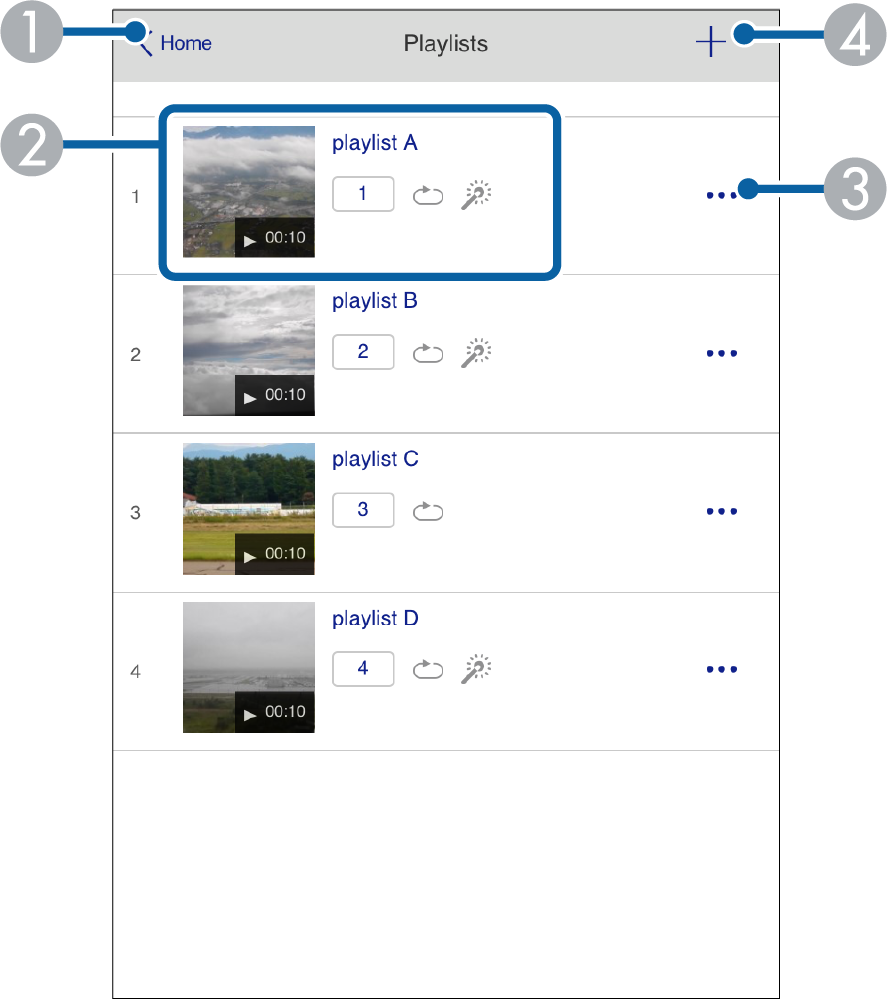
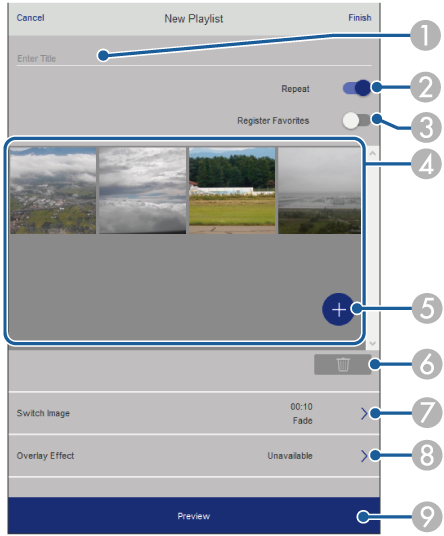
Options on the Playlist screen allow you to select the playlist you want to play from the list, and create or edit playlists.
|
|
Returns to the Epson Web Control screen. |
|
|
Starts projecting the playlist. The icons indicate the playlist settings.
|
|
|
Opens the menu that allows you to edit, copy, register to your favorites, or delete the playlist. When you select Edit or Duplicate, the Edit Playlist screen is displayed. |
|
|
Opens the New Playlist screen where you can create a new playlist. |
|
|
Edits the playlist name. |
|
|
Selects whether to enable repeat playback or not. |
|
|
Registers the playlist as favorites. When registering favorites, you can quickly start playback of the favorite playlist using the Remote screen or the remote control. |
|
|
Displays the images or movies you have added to the playlist. The playlist plays the images or movies in order. |
|
|
Adds images or movies to the playlist. |
|
|
Deletes images or movies from the list. |
|
|
Opens the Switch Image screen. You can specify the time interval to switch to the next image file. You can also select a transition effect. |
|
|
Opens the Effects screen. You can add predefined color and shape effect filters to a playlist. You can also create a customized effect. |
|
|
Previews the playlist. |
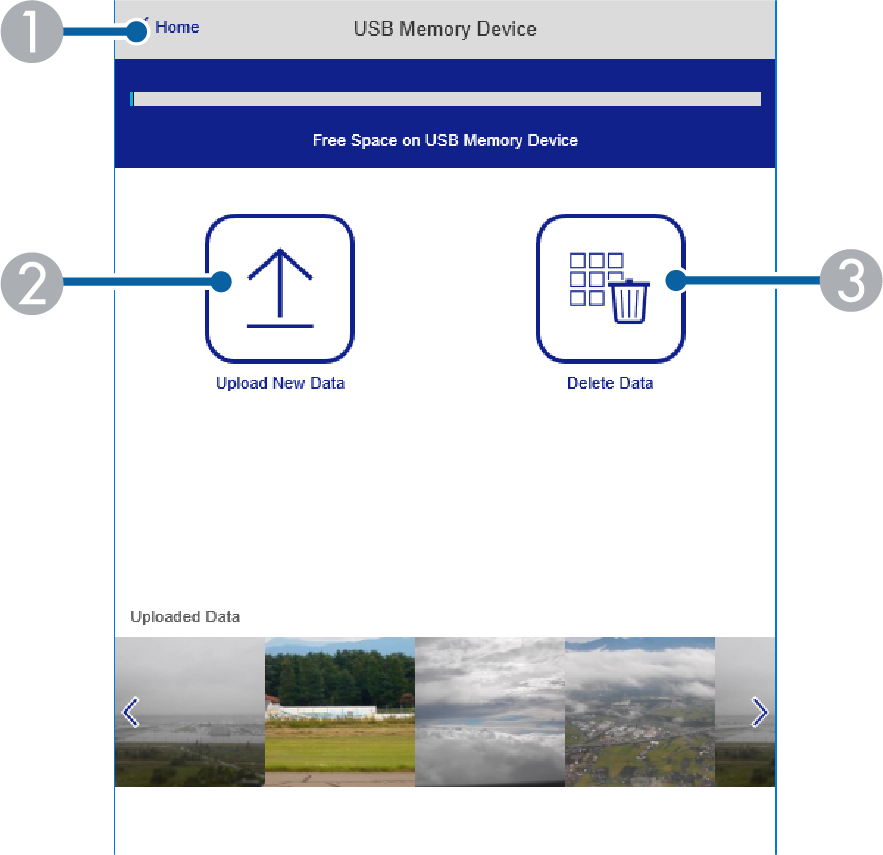
Options on the USB Memory Device screen allow you to upload data for a playlist to the USB flash drive or delete the data on the USB flash drive.
You can upload .avi, .jpeg (.jpg), .png, .bmp, or .gif files.
If you want to add the .mp4 and .mov files to the playlist, use the Epson Projector Content Manager software or the Epson Creative Projection app.
|
|
Returns to the Epson Web Control screen. |
|
|
Copies images or movies you want to add to playlists to a USB flash drive. |
|
|
Deletes images or movies on the USB flash drive. |
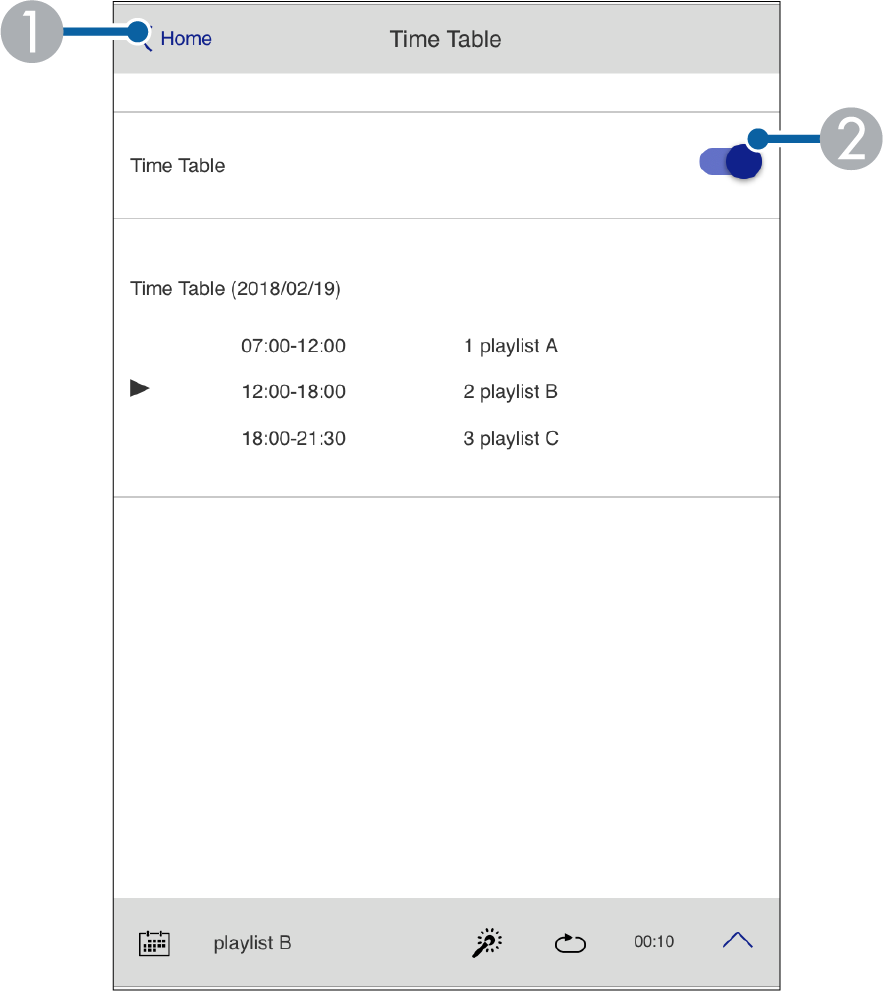
Options on the Time Table screen allow you to enable or disable the specified time table features.
|
|
Returns to the Epson Web Control screen. |
|
|
Turns the time table on or off. |
You can specify when each playlist starts and finishes using the time table feature in the Epson Projector Content Manager software.
For details, see the Epson Projector Content Manager Operation Guide.


