
Once you have connected your projector to your network, you can select projector settings and control projection using a compatible Web browser. This lets you access the projector remotely.
In Content Playback mode, you can also edit playlists.
In Content Playback mode, do not remove the USB flash drive from the projector or disconnect the projector's power cord in the following situations. Data saved on the USB flash drive may be damaged.
When the Playlists screen is displayed
When the USB Memory Device screen is displayed

Make sure the computer and projector are connected to the network. If you are connecting wirelessly, connect to devices over a wireless network access point.
You can use the following Web browsers.
Microsoft Edge (Windows)
Safari (Mac, iOS)
Chrome (Android)
While using the Web browser, do not connect using a proxy server. You cannot select all of the projector menu settings or control all projector functions using a Web browser.
If you set the Standby Mode setting to Normal in the projector's Operation menu, you can use a Web browser to select settings and control projection even if the projector is in standby mode (when the power is off).
You can also control the projector using a Web browser through the Epson iProjection (iOS/Android) app.
Make sure the projector is turned on.
Make sure your computer or device is connected to the same network as the projector.
Start your Web browser on the computer or device.
Go to the Epson Web Control screen by entering the projector's IP address into the browser's address box. When entering an IPv6 address, wrap the address with [ and ].
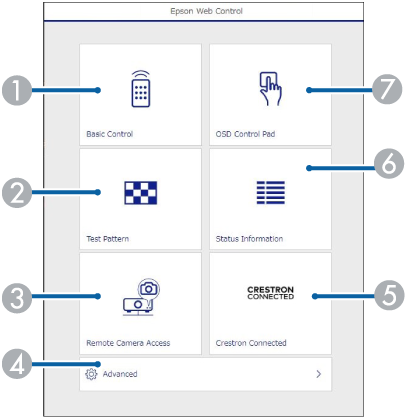
In normal mode
|
|
Controls the projector remotely. |
|
|
Displays a test pattern. |
|
|
Takes an image capture of the displayed image from a remote location. Available only when the Remote Camera Access menu is enabled in the projector's Network menu. |
|
|
Sets detailed projector settings. |
|
|
Opens the Crestron Connected operation window. Available only when you set the Crestron Connected system. |
|
|
Displays the projector's status. |
|
|
Operates the projector's menu settings with your finger or mouse. |
You can also check the projector's log files by entering "https://<projector's IP address>/logs/" into your browser's URL bar when you set Log Save Destination to USB and Internal Memory in the projector's Management menu.
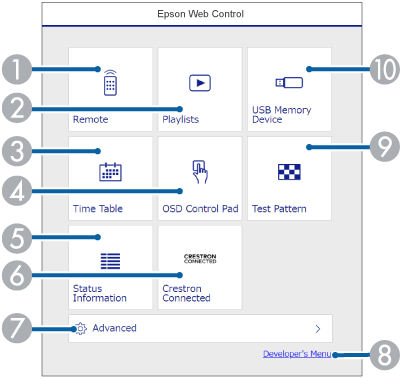
In Content Playback mode
|
|
Controls the projector remotely. |
|
|
Selects the playlist you want to play, and allows you to create or edit playlists. |
|
|
Displays the Time Table screen. |
|
|
Operates the projector's menu settings with your finger or mouse. |
|
|
Displays the projector's status. |
|
|
Opens the Crestron Connected operation window. Available only when you set the Crestron Connected system. |
|
|
Sets detailed projector settings. |
|
|
Displays the Developer's Menu screen. |
|
|
Displays a test pattern. |
|
|
Registers or deletes the data for a playlist on the USB flash drive. |
Select the option corresponding to the projector function you want to control.
You may need to log in to access some of the options on the Epson Web Control screen. Set the following passwords first.
To access the Basic Control option, you need to log in using EPSONREMOTE as the user name and your Remote Password. (No password is set by default.)
Set Basic Control to On in the projector's Network menu, and then set the password.
 Network >
Network Settings >
Projector Control
>
Basic Control
Network >
Network Settings >
Projector Control
>
Basic Control
To access other options and save settings, you need to log in using EPSONWEB as the user name and your Web Control Password. (No password is set by default.)
Set the password in the projector's Network menu.
Network >
Network Settings >
Web Control Password
 Related Links


